
Fossil hunting is a fascinating pastime enjoyed by families and individuals of all ages and levels of experience throughout the year. With just a little time spent learning the basics anyone can enjoy the thrill of finding evidence of prehistoric creatures and the environments they lived in. The following page offers some guidance to getting started, including the best places to look and techniques for fossil hunting effectively and safely.
What is a fossil?
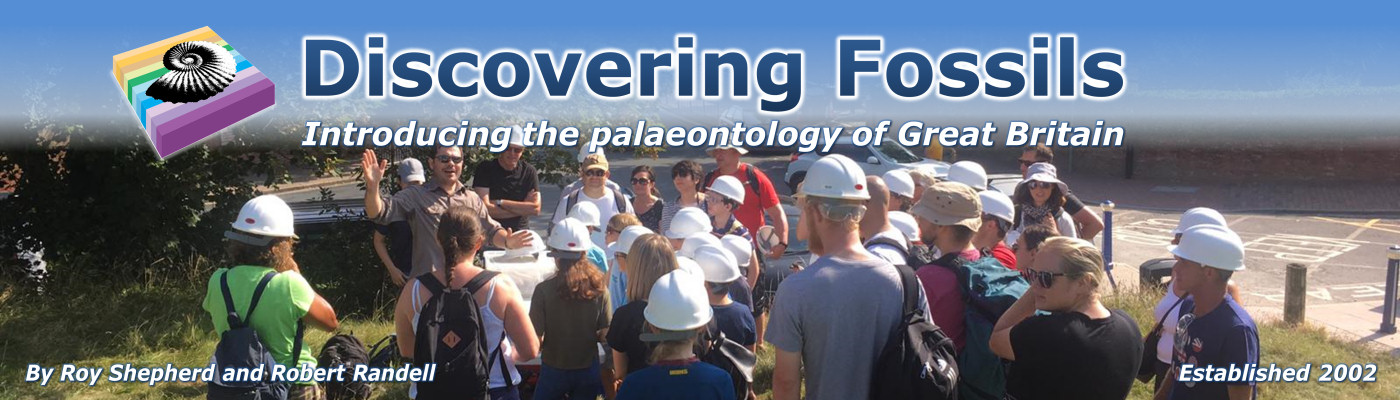
Above: Roy Shepherd with an ammonite at Quantoxhead (Somerset)
The modern use of the word ‘fossil’ refers to the physical evidence of prehistoric life that is preserved from a period of time prior to recorded human history. There is no universally agreed age at which the evidence can be termed fossilised, however it’s broadly understood to encompass anything more than a few thousand years. Such a definition includes our prehistoric human ancestry and the ice age fauna as well as more ancient fossil groups such as the dinosaurs, ammonites and trilobites.
Fossils occur commonly around the world although just a small proportion of former life made it into the fossil record, perhaps less than a billionth. Most living organisms simply decayed without trace after death. Thus, the abundance of fossils reflects the immense number of organisms that have lived and the vast length of time over which the rocks have accumulated. To read more about how fossils form click here.
The earliest fossils discovered date from 3.5 billion years ago, however it wasn’t until approximately 600 million years ago that complex multicellular life began to enter the fossil record, and for the purposes of fossil hunting the majority of effort is directed towards fossils of this age and more recent.
The geologic timescale is divided into eras which are further divided into periods, of which the most frequently quoted is the Jurassic period (from the Mesozoic era) – famous for the abundance of dinosaurs at this time. To view the geologic timescale click here.
Where to look for fossils?
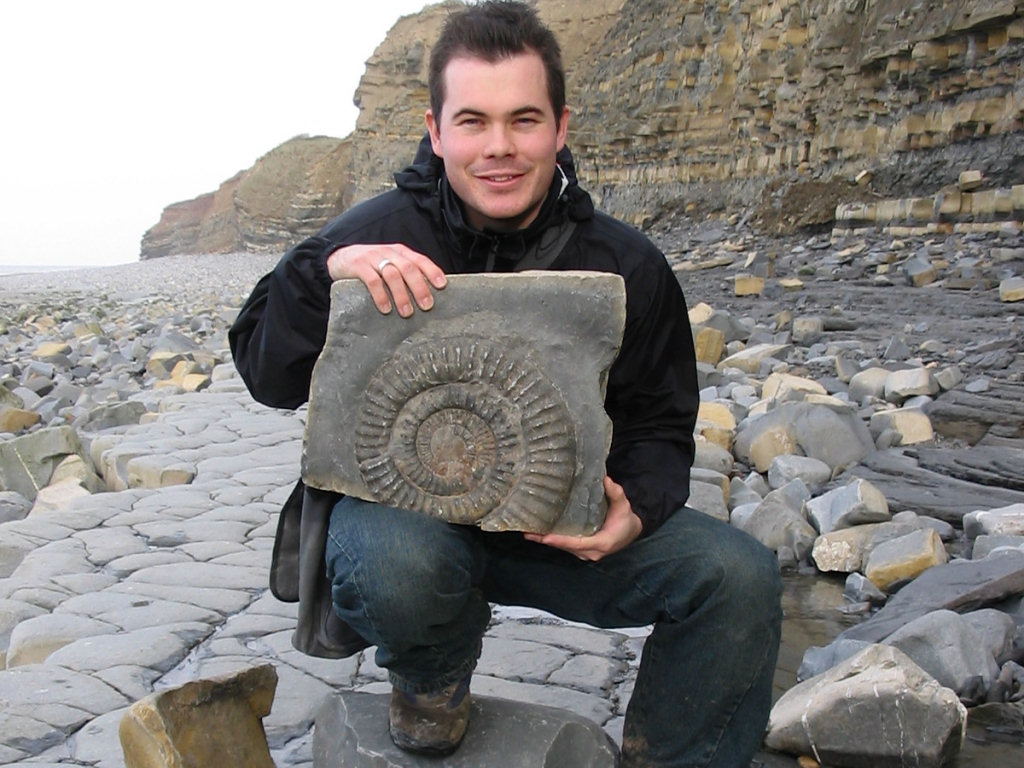
Above: Fossil hunting on the beach at Hastings in East Sussex.
The first step towards understanding where to look for fossils is to appreciate the distribution of fossil bearing rocks and the conditions that led to their formation and subsequent exposure. The rocks reveal the conditions present at the time of their formation and the forces that subsequently influenced their character.
There are three primary rock types: sedimentary, formed from accumulated sediment, e.g. sand, silt and skeletal remains; igneous, formed from molten rock that has cooled and hardened; and metamorphic, sedimentary or igneous rocks that have been altered significantly by heat and/or pressure.
Fossils are most commonly found within sedimentary rocks due to the favourable conditions of burial and limited alteration through time. Sedimentary rocks form on the Earth’s surface as sediment accumulates in rivers, lakes and on the seafloor in particular. Among the common sedimentary rocks include: sandstone, composed predominantly of grains of eroded rock; limestone, composed predominantly of shell debris and planktonic skeletons; and shale, formed from hardened clay (originally deposited as mud).
Sedimentary rocks may undergo considerable change millions of years after deposition resulting in a new rock type, e.g. slate. These ‘altered’ rocks are collectively known as metamorphic. Slate was originally laid down as a muddy sediment which was then compacted and hardened to form shale (a sedimentary rock), over time the shale was exposed to greater pressure and heat within the ground, a result of continental movement and/or tectonic activity. Over time the fabric of the shale was altered, replacing the original fabric and converting it to a metamorphic rock, consequently fossils within the slate are often flattened and distorted.
On very rare occasions fossils can also be found within igneous rocks where molten rock escapes to the Earth’s surface and envelops organisms in its path, such as a tree. In this example if the molten rock cools and hardens in less time than it takes to turn the tree to ash, then the hardened rock may form a solid mould around the tree. Over a short period of time the tree tissues decay leaving an empty chamber inside the rock, some examples even preserve the texture of the outer bark on the walls of the mould.
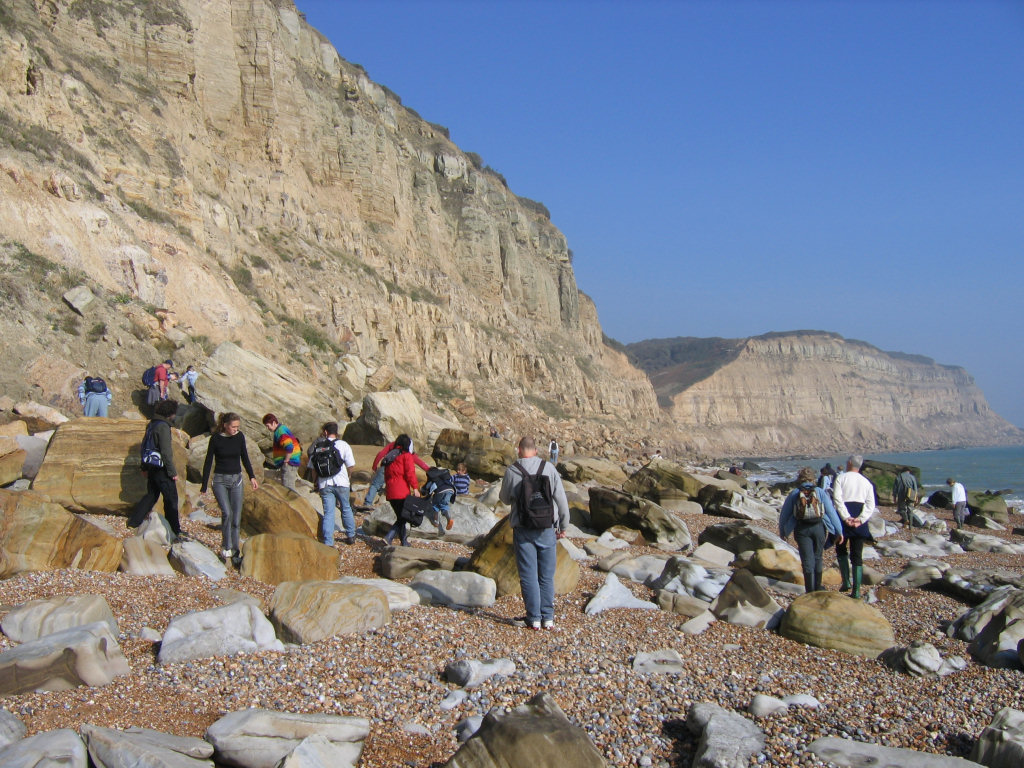
Having recognised unaltered sedimentary deposits as the main source for fossils, the next step is to understand where such rocks are located. Geology maps are a useful place to start as they reveal the age and type of rocks present at the surface; note that the surface rock is generally underlain by older rocks unless significant geological forces have caused buckling/folding of the landscape.
Above: geological summary of northwest Europe indicating the age of the rocks. Source: Ian West
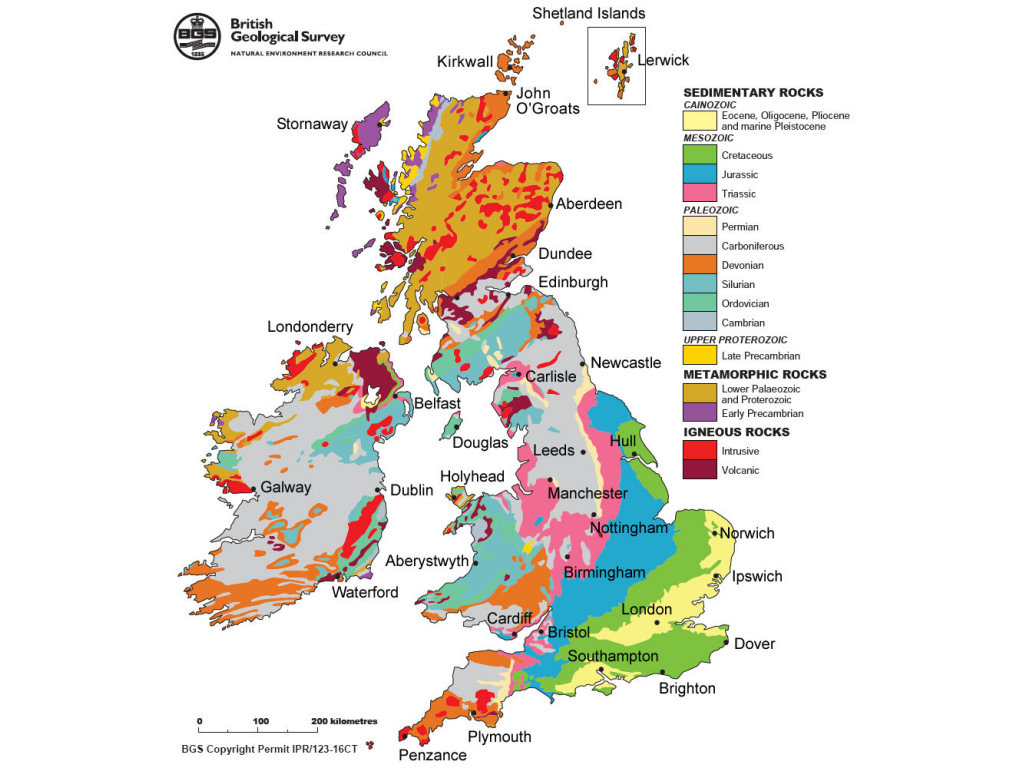 Above: A more detailed geology map indicating various sedimentary rocks of the UK. Source: BGS
The map above indicates the age of the surface rocks, colour coded according to the period in which they originally formed, for example the Jurassic (blue) 200-145 million years ago (mya) and Cretaceous (green) 145-65 mya. A map such as this is a useful starting point to understand the distribution of rocks and the type of fossils that might (or might not) be encountered. For example regardless of the conditions in which the rocks were formed, Pre-Cambrian rocks (red) which date from 542-488 years ago, won’t contain reptile bones as this group did not evolve until much later. Likewise the ammonites are confined to the Jurassic and Cretaceous periods, at the end of which they became extinct. A knowledge of which organisms existed during which periods is useful.
Having established the relevance of age to the prospect of finding certain fossil groups, the next step is to appreciate that age alone does not dictate which fossils may be encountered. It’s useful to consider the variety of conditions simultaneously present today and apply these principles to the prehistoric world – which had rivers, coastlines, seas, oceans and deserts just like today. Thus sediments of different types are laid down simultaneously and will ultimately contain different fossils groups, e.g. Jurassic limestones may contain ammonites, but Jurassic river sediments will not, as ammonites were exclusively marine. Similarly changes to the environment in a given area may dramatically alter the type of sediments deposited at a particular location. A vegetated region may produce coals, but a rise in sea level may flood the area leading to the deposition of sandstones.
An example of this can be seen in the Early Cretaceous rocks of southeast of England which contain sandstones (formed near land in a delta-like environment) but are overlain by Late Cretaceous chalk (formed far from land at the bottom of the sea). The transition from sandstone to chalk represents a rise in sea levels (marine transgression) that took place globally towards the end of the Cretaceous period, submerging much of the land and reducing the supply of land sourced sediments; only the skeletons of plankton continued to accumulate to any great extent (forming chalk). Subsequently, the fossils in the sandstone are more likely to contain dinosaur bones whereas the chalk contains fossils of marine origin such as the ammonites and sharks.
Once the basic geology of the area is understood the next step is to research locations where the bedrock is exposed, this isn’t always easy, as inland outcrops are often obscured beneath soil and coastal locations may be inaccessible. Fortunately there are well documented locations where fossil collecting can take place, these include quarries and many coastal locations. Permission and insurance is usually required to access quarries, as such it’s best to accompany a local geology group who have existing relationships with the quarry operators and public liability insurance as well. Coastal locations on the other hand are usually accessible without permission unless stated otherwise.
Where possible the locations featured on Discovering Fossils include as much geological information as is publicly available. To find a fossil location within the UK click here. Detailed geology maps and books are available on a regional and local level (as shown above) from UKGE.
Join us on a fossil hunt!
Discovering Fossils guided fossil hunts reveal evidence of life that existed millions of years ago. Whether it’s your first time fossil hunting or you’re looking to expand your subject knowledge, our fossil hunts provide an enjoyable and educational experience for all. To find out more CLICK HERE.
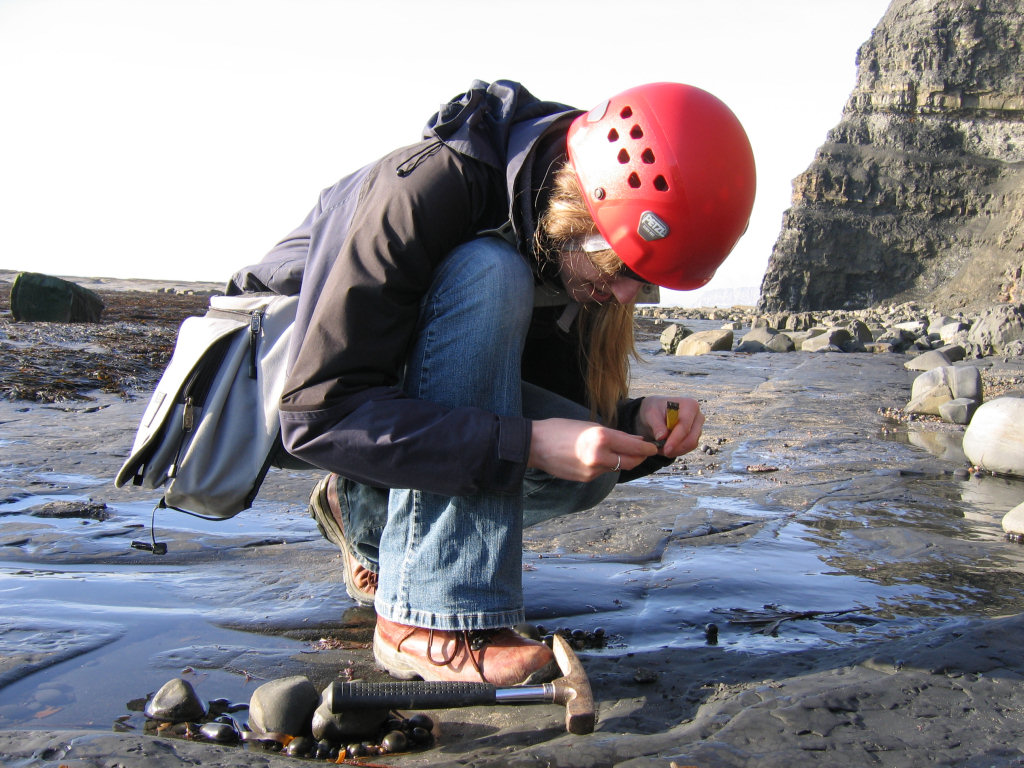
What tools and equipment will you need?
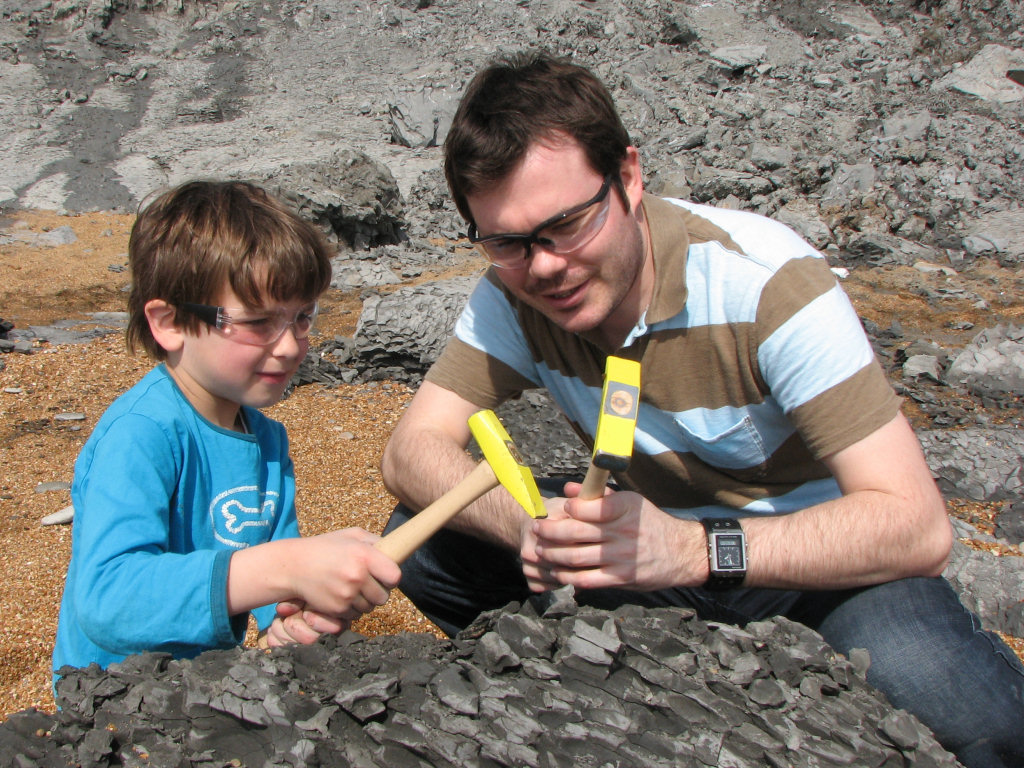 Above: Roy and Louis hammer a boulder in search of fossils at Seatown.
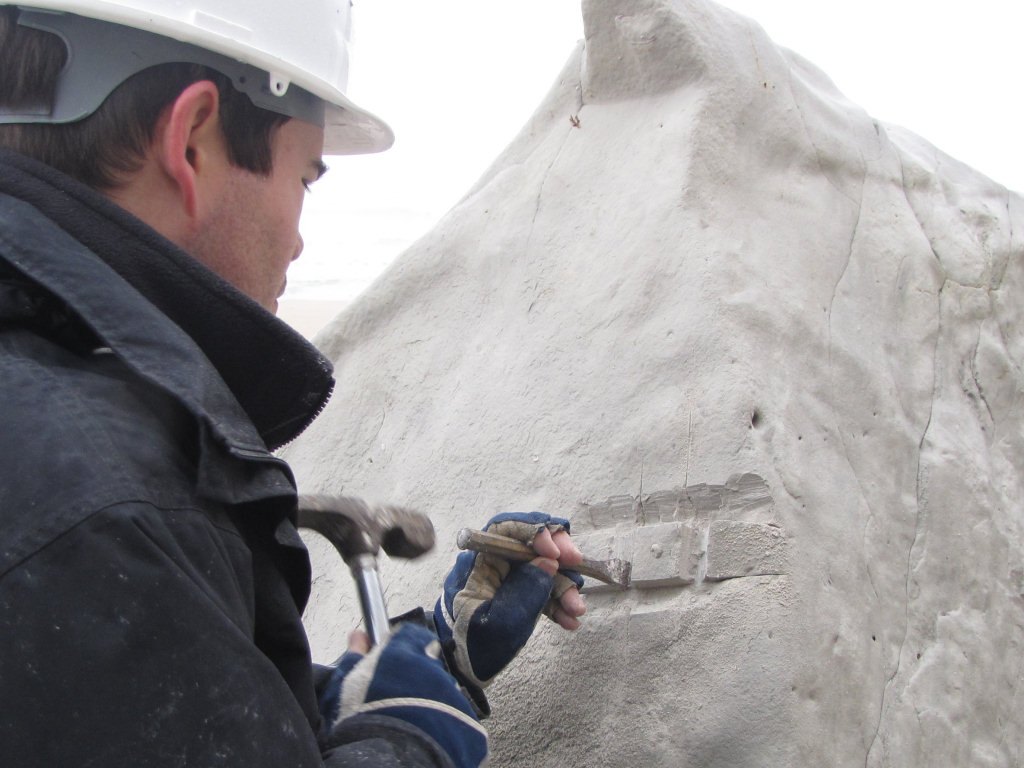
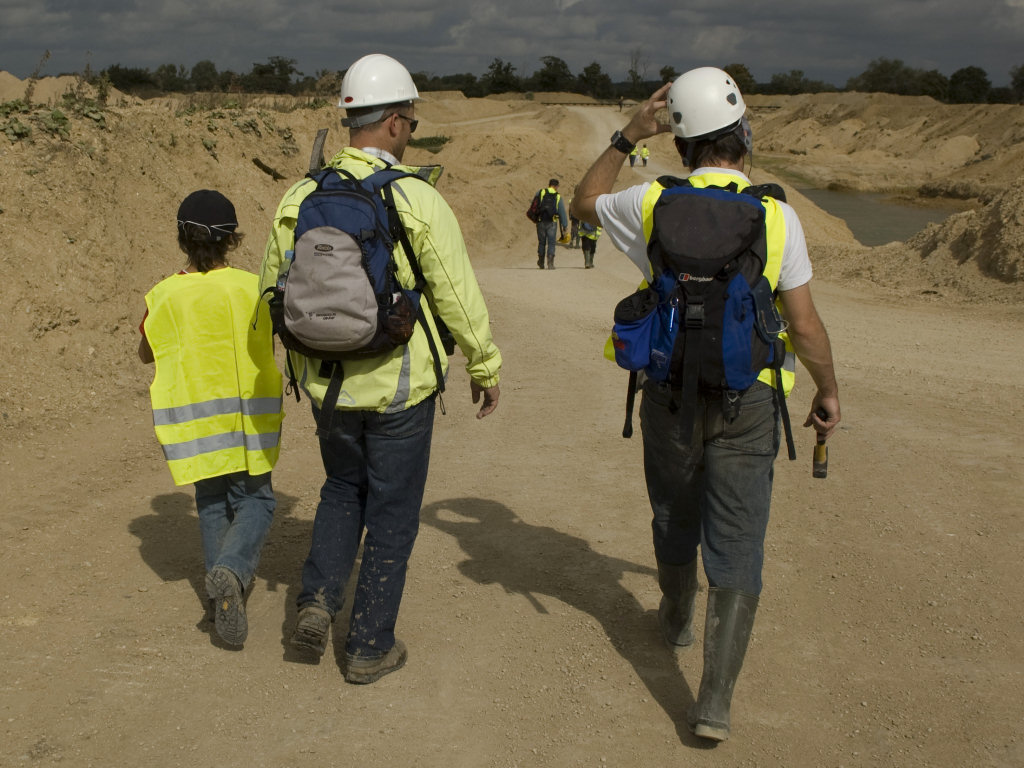 Above: A hard-hat and high visibility jacket are a legal requirement in working quarries and a good idea anywhere where there’s a risk of falling rocks, especially around cliffs.
Fossil hunting can vary from a tranquil stroll on a beach in shorts and t-shirt during the summer, to extreme physical challenges in the depths of winter. As well as recognising the need to dress appropriately, it’s worth spending some time selecting the tools needed to assist you during the trip. Preparation in advance will help ensure your visit is productive and safe.
For locations where the rock is hard a hammer and chisel combination are the most suitable tools, others prefer to use a geologist’s hammer in isolation, however this offers less control when extracting fossils. The hammer should be as heavy as can be easily managed without causing strain to the user, for individuals with less strength and children a head weight of 500g or less is recommended. A chisel is required in conjunction with a hammer for removing fossils from the rock – a large chisel for completing the bulk of the work and a smaller, precise one for finer work. A chisel composed of cold steel is recommended as these are especially engineered for hard rock.
While hammering rocks there’s a risk of injury from rock splinters unless the necessary eye protection is worn. Safety glasses ensure any splinters are deflected away from the eyes. Eye protection should also be worn by spectators as splinters can travel several metres from their origin.
For more information and examples of the tools and equipment recommended for fossil hunting click here.
When is the best time to fossil hunt?
Above: Fossil hunting after stormy weather can provide the best opportunity for finding fossils.
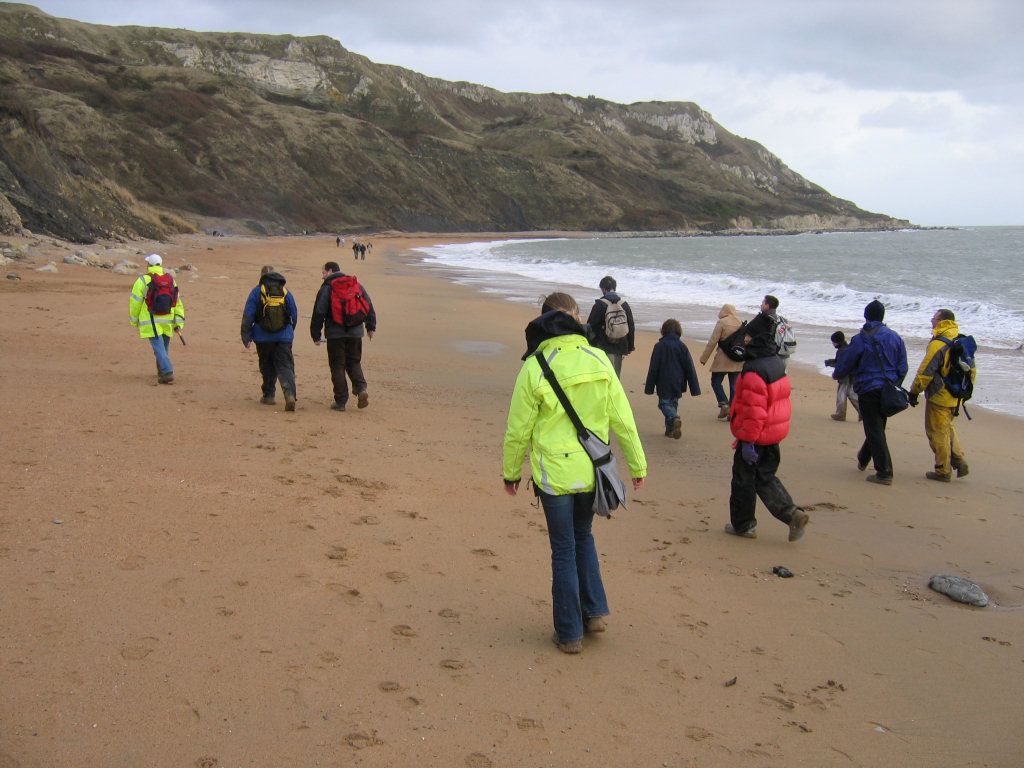
Fossil hunting can be undertaken throughout the year, although the winter and spring tend to yield a greater volume of finds along coastal stretches due to the scouring action of the wind, rain and rough seas. During the summer, when the rate of erosion is generally lower, fossil collecting is more reliant on splitting prospective rocks or examining air-weathered surfaces.
Regardless of the time of year, in coastal locations it’s best to coincide your visit with a falling tide. If the tide has already begun to rise upon your arrival then collecting will be confined to a limited area and time. Most coastal locations follow a 12 hour cycle, with low-tide occurring 6 hours after high-tide and then rising to high-tide 6 hours later. Local tide times (up to seven days in advance) are available on the BBC’s website click here.
How to fossil hunt safely?
 Above: A hard-hat is recommended in areas where falling rocks may occur.
Above: Make a note of the tide times before you leave and avoid getting cut off.
For the majority of time, when undertaken sensibly and with knowledge of the personal risks, fossil hunting is reasonably safe; however it’s not possible to eliminate all risk, as is the case with many other recreational activities too.
Productive fossil collecting locations typically occur in areas with high rates of erosion, mostly due to natural forces and sometimes by the actions of people. In these areas you’re likely to encounter unpredictable terrain including: falling rocks, slippery surfaces, areas prone to isolation by the incoming tide, steep drops and unstable surfaces. In extreme cases these hazards could result in serious injury.
For more information about the hazards of fossil hunting and the precautions to take click here.
Considerations before extracting a fossil
 Above: Robert, Denise and Lucinda alongside a giant in situ ammonite at Peacehaven.
In most instances fossils can be collected without causing unnecessary damage to the area or breaking the law; however, there are locations and instances where visitors must follow specific guidelines when collecting, especially Sites of Special Scientific Interest (SSSIs). An example of this would be the giant ammonites on the foreshore at Peacehaven which fall within the SSSI protection status. It’s worth researching the area beforehand to understand the restrictions, where possible this information is outlined within each of the locations featured on Discovering Fossils.
As a general rule fossils that are in situ (in their original position within the bedrock, beach platform or cliff-face) should not be collected. Extracting a specimen that is in situ can cause damage to the surrounding area, it’s also a much more complicated procedure and can result in irreparable damage if undertaken carelessly. There are possible exceptions to this rule, for example if the specimen is of scientific value and at risk of being damaged. In instances such as this, an experienced member of the scientific community should be consulted to offer support and advice; it’s best to avoid commercial collectors in these circumstances. Experienced, independent advice can be sought from Discovering Fossils, we also have contacts around the country who can help you.
Extracting fossils
Above: An echinoid has been pedestalled to help protect it during extraction using a hammer and chisel.
Once a decision to extract a fossil has been reached the next step is to carefully plan an appropriate method of extraction. During the extraction the fossil is at its most vulnerable; the surrounding rock (matrix) can be unpredictable and crack or shatter when least expected. A well planned extraction reduces the risk of damage and takes into consideration the desired end result, i.e. how the specimen will be prepared and displayed. It’s worth pausing for a moment and considering the various outcomes that may arise.
In some cases it may be necessary to strengthen the specimen and/or surrounding matrix before progressing. For example it’s common to find naturally occurring cracks passing nearby, beneath or even through the fossil; a weak matrix might crumble during the extraction and must therefore be stabilised before progressing. A fast-setting superglue is a controversial technique but useful in these situations, providing essential stability before hammering. Note that overuse or misguided application can create irreversible damage to the specimen (children should be supervised at all times). As a general rule use as little glue as necessary and apply it as far from the specimen as possible – a drip of liquid superglue will follow the crack unaided. Avoid allowing the glue to make contact with the surface of the fossil as it can be difficult to remove. Once the fossil and matrix are stable the extraction can take place.
It’s advisable to retain as much matrix around the specimen as possible as this will protect it during extraction and transportation. The example above shows a fragile echinoid shell exposed on an air-weathered chalk surface. Before removing the specimen a pedestal was created around the fossil, this was achieved using a hammer and sharp chisel to remove the matrix to within 3cm of the specimen and to a similar depth. The base of the pedestal provides a safe horizon below the specimen to undercut it, a few gentle taps releases the pedestal with the fossil undamaged on top.
For fossils contained within softer rocks and clays a steel point can be used instead of a hammer and chisel. The example above shows a fragile gastropod shell being carefully extracted from in situ. In this instance the matrix isn’t desired and the shell can be removed safely and transferred to a padded container.
For more information please refer to our Conserving Prehistoric Evidence guide.
Transporting fossils safely

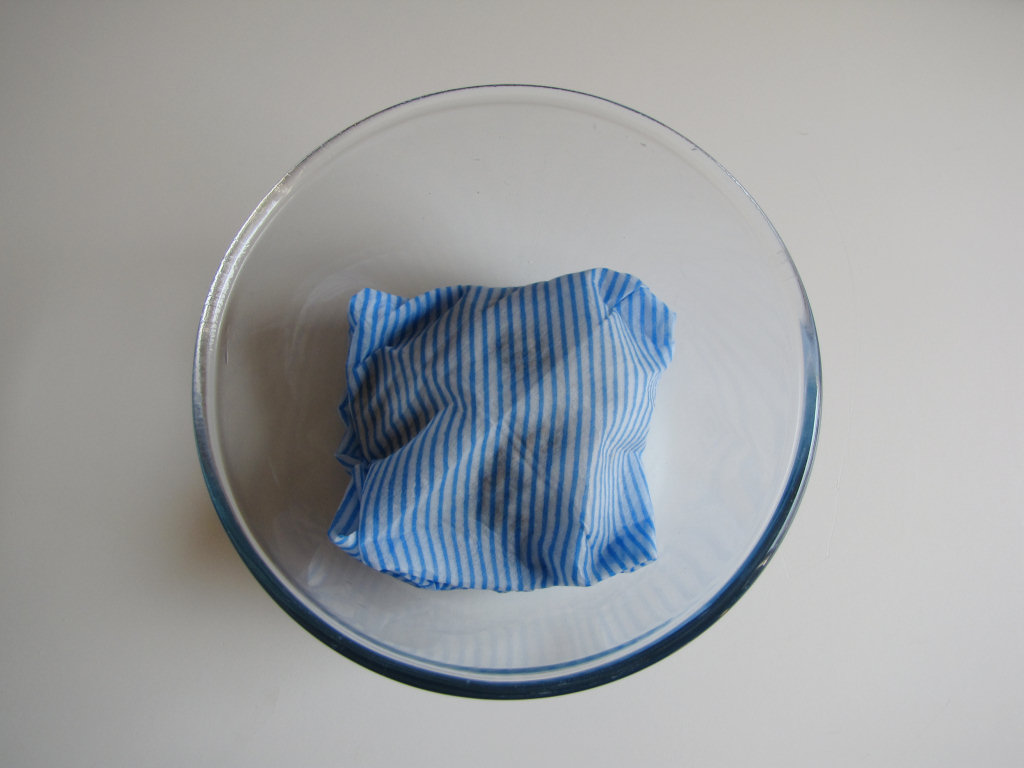
Above: Foam wrap is the best all round material for protecting larger specimens in transit.
Once the specimen has been extracted it needs to be carefully wrapped with foam or an equivalent such as newspaper, being careful not to crush it in the process. Before beginning observe whether the specimen is dry or wet, the aim is to maintain the fossil in its current state until it can be prepared at home. Rapid changes in water content resulting from drying or soaking can cause damage to the specimen. This is especially important for fossils found on the coast which require soaking to remove unwanted salt from the matrix and fossil; a fossil which has been allowed to dry in transit may be damaged when it comes to soaking.
Place the fossil in the centre of a single sheet of foam and fold each of the corners over and specimen. Continue wrapping until the specimen is contained within a small parcel, apply as much foam as you feel necessary to prevent any damage occurring from knocks or bumps. To finish off use a couple of elastic bands to hold the foam in place. Sticky tape can also be used but is unsuitable in wet conditions.
Recording key information
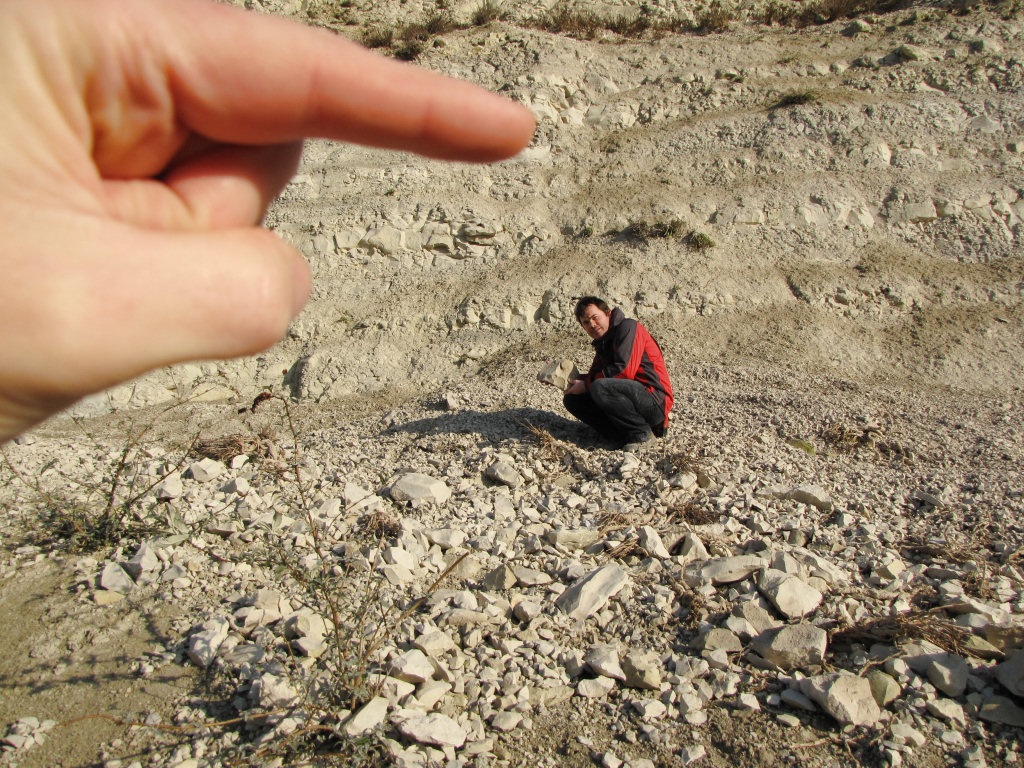 Above: Simply positioning a finger in the photograph is an effective way of recording the position at which the fossil was found or originated from.
Above: At Bracklesham Bay the buildings on the skyline are used as a landmark for future reference. Permanent landmarks are preferred if possible.
It’s good practice to document the locations at which fossils are discovered as this contributes to their scientific value. Keeping a record of the location and horizon (if known) makes the task of identifying fossils at a later stage less complicated; likewise if the specimen transpires to be a new species, these details will prove essential. An accurate record of the fossil will also be valuable to future recipients such as museums and other collectors.
A digital camera is an effective tool for recording this information. It’s worth taking multiple photos from different angles, capturing as much of the backdrop as possible and indicating using a finger the position at which the fossil was found. In addition to taking photographs, any specific information that can’t be captured visually e.g. the formation or bed name (if known) should be noted on a paper pad.
Once at home, the information gathered should be stored in a safe place and a corresponding label affixed to the underside of the specimen for easy reference.
Basic fossil preparation
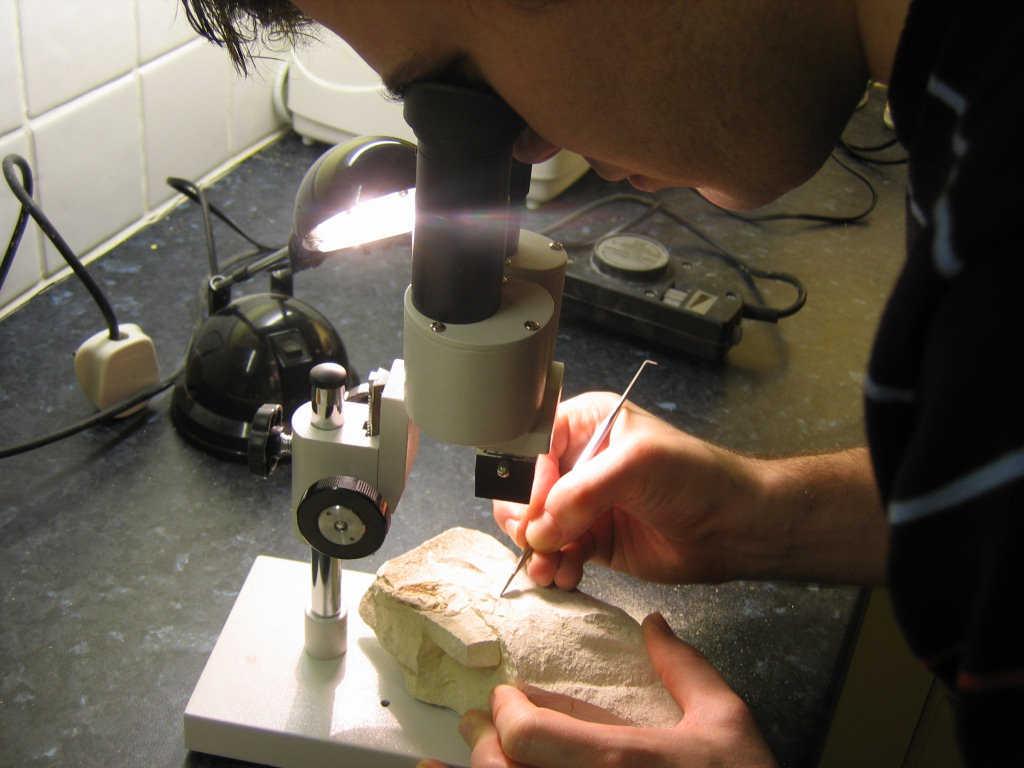
Above: A microscope is useful for conducting delicate preparation work.
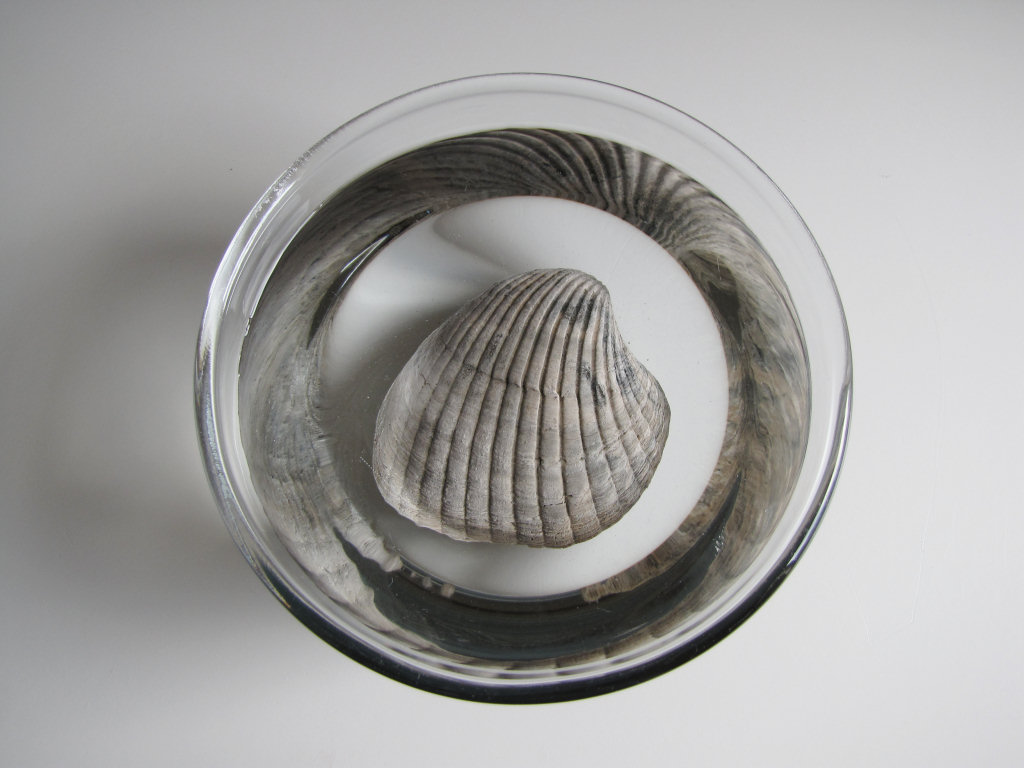
 Above: Fossils recovered from coastal locations may require soaking to remove the salt.
Having successfully retrieved the fossil the task of preparing it for study and display can begin. The process can be lengthy and complicated, but with practice the results can be truly outstanding, likewise some fossils require little preparation beyond basic stabilisation.
As a large number of fossil collecting locations occur on the coast, salt contamination is the first threat that needs to be addressed. Salt naturally attracts water from the air, dissolving in the process and re-crystallising as the humidity reduces; conditions in a typical home or museum fluctuate frequently, accelerating the process. Left untreated salt crystals can cause long-term instability to the matrix and fossil. To remove the salt the specimen must be soaked in fresh water. Some materials however should not be soaked, as doing so can cause the matrix to disintegrate e.g. Gault Clay. Others, such as flint, are simply too dense to be affected by salt. If in doubt experiment on a small, unwanted piece of the matrix.
If the fossil has been in transit or storage long enough to dry out, or was collected on a dry day, you’ll need to cover it with a wet kitchen towel or cloth, this will allow the water to be absorbed gradually. Try to avoid submerging dry specimens in water as rapid exposure is likely to shatter soft matrix and the fossil with it. You may need to leave the fossil covered for up to 48 hours, adding small amounts of water to the towel as required; a sealed container with a small amount of water in the bottom can assist the process. Once the moisture levels have been increased, carefully submerge the fossil in fresh water and soak it for 1-2 weeks (the longer the better), changing the water every few days to assist the process. It’s a good idea to keep the container out of direct sunlight to prevent algae growth.
Above: The moisture levels in this bivalve from Bracklesham Bay are increased gradually by wrapping it in a damp cloth and placing it in a few millimetres of water.
Above: After 24 hours the fossil is saturated and can be safely submerged in water. The specimen suffered no damage as it was gradual moistened prior to soaking.
Once the soaking is complete and the salt extracted the fossil can be removed and any remaining dirt or unwanted loose matrix brushed away, a soft bristled toothbrush is an effective tool in most instances. The specimen should be allowed to dry naturally away from any direct heat source. Small specimens may dry in a matter of days whereas larger examples may require a week or two. Keep a close eye on the specimen throughout the drying phase and consolidate (with a liquid superglue) any major cracks which may develop as the matrix contracts.
With the specimen now clean and dry the next step should be to address any remaining cracks that may interfere with the further preparation. A few drips of fast setting liquid superglue is one possible solution (see below-left). For hairline cracks and to strengthen and protect surface details a dilute solution of Paraloid B72 in acetone can be applied, this also has the advantage of being removable at a later stage (unlike superglue which is permanent).
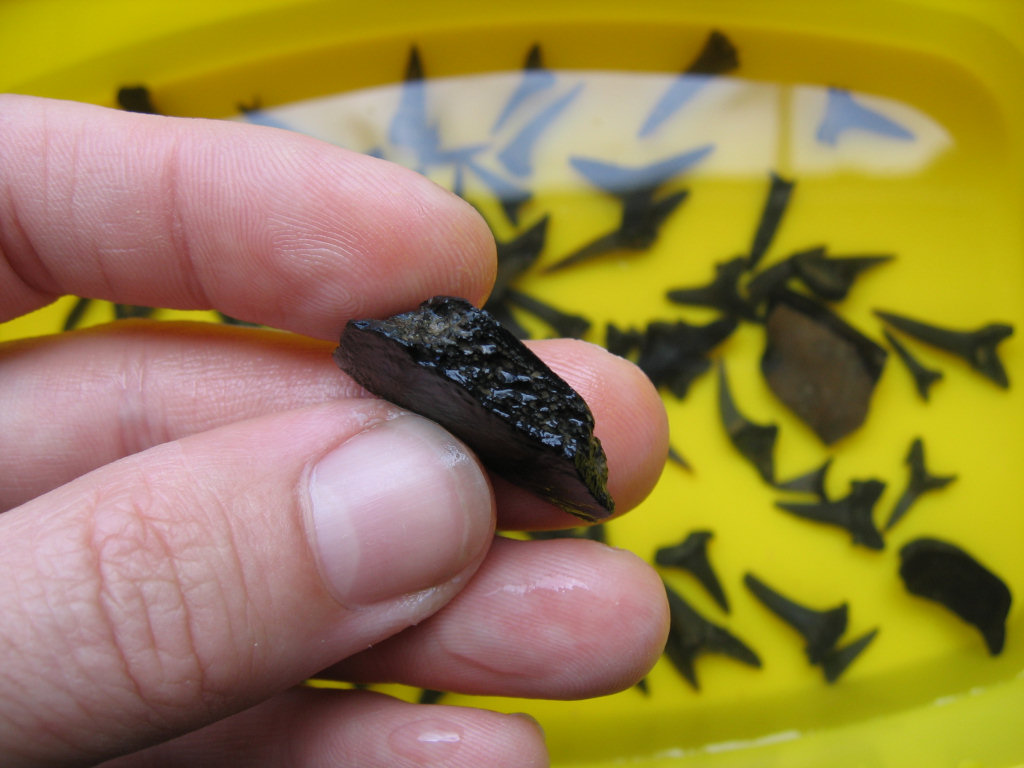
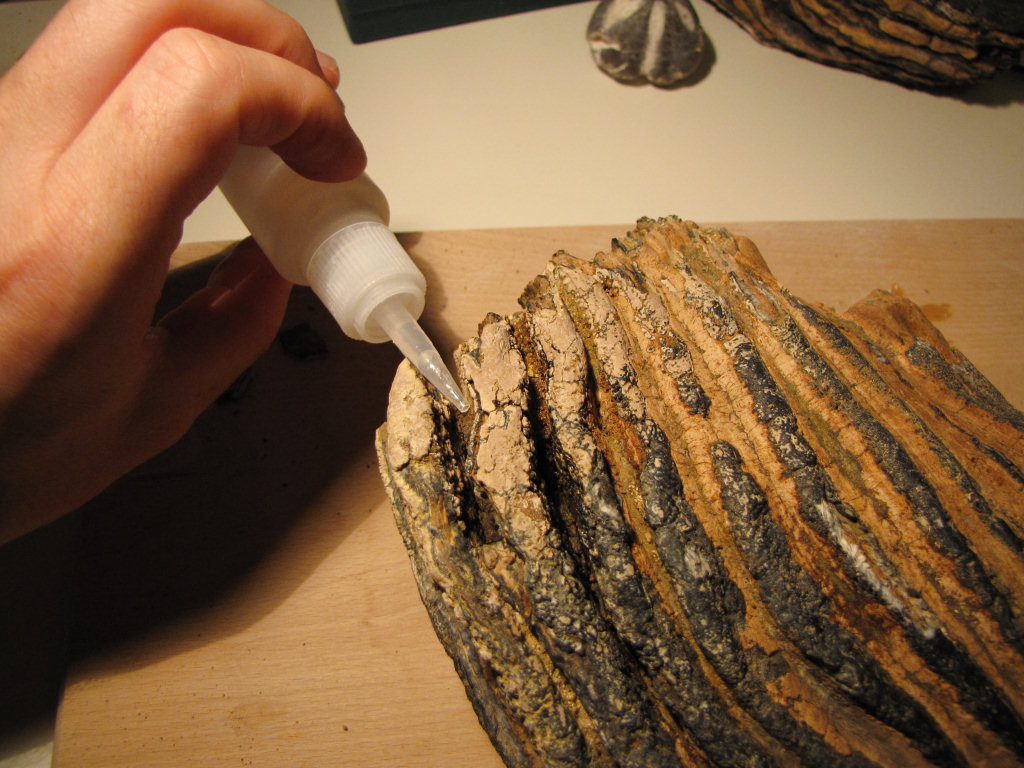 Above: A thin liquid superglue is applied to consolidate the weak outer section of this mammoth tooth, being careful to avoid spilling onto the tooth’s surface.
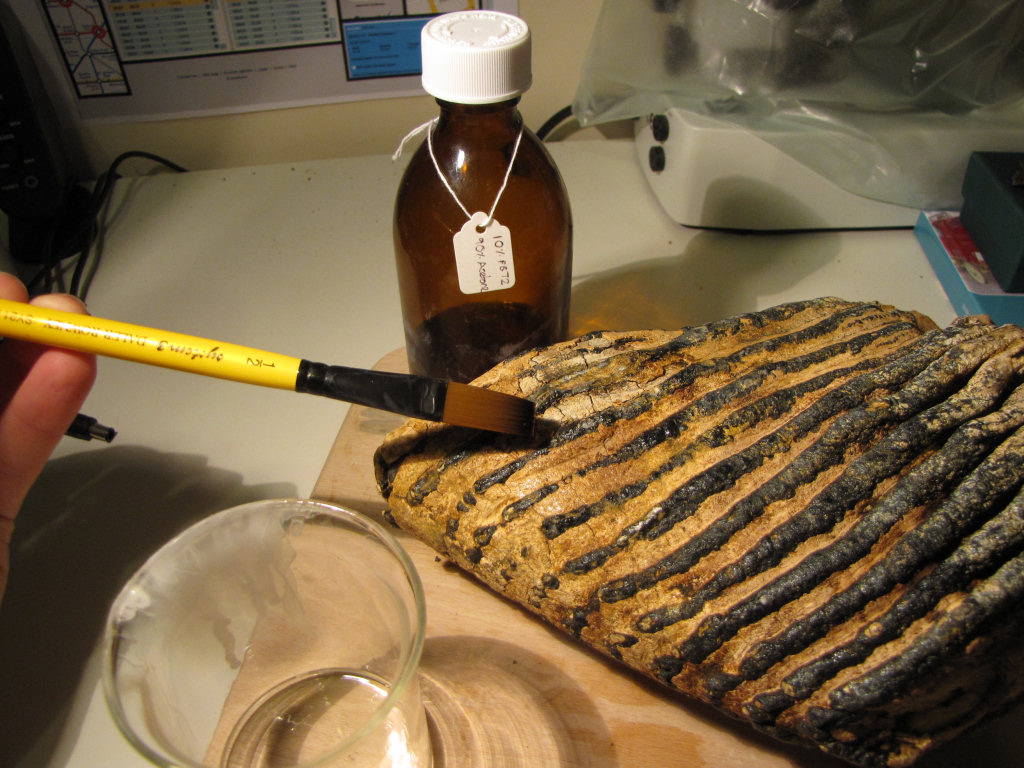 Above: Paraloid B72 dissolved in acetone is used to strengthen the fragile surface of the tooth; the excess can be easily removed with acetone at a later stage.
Having stabilised the matrix and reduced the risk of cracks affecting the preparation area the delicate task of exposing the fossil can begin. The aim is to remove enough of the surrounding matrix in order to display the fossil as fully as possible without compromising its long-term stability. Moderation and control are required as over ambitious preparation can leave the fossil vulnerable to damage or cause it to fall apart.
Depending on the particular specimen there are various preparation tools and techniques available. For specimens surrounded by relatively soft matrix such as chalk, much of the work can be undertaken with a simple metal tool – a dental probe can be easily adapted to form an effective spear-shape digging tool (see example below-left). A microscope is useful for undertaking precision work, especially if the specimen is fragile.
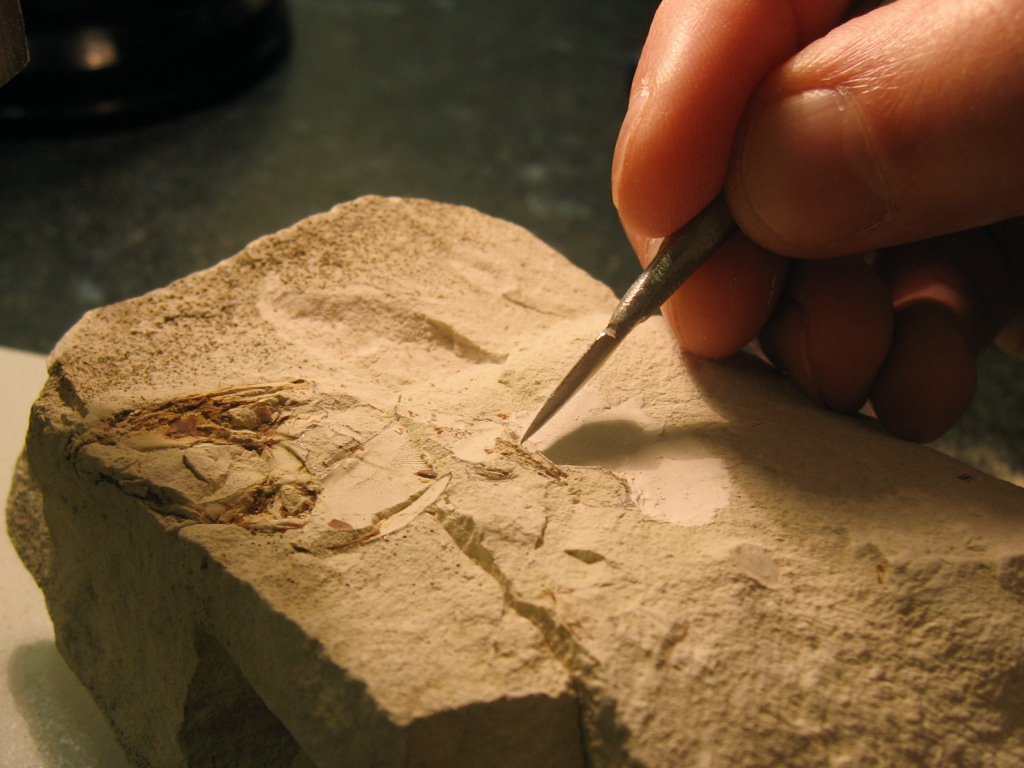 Above: A spear-shaped dental tool is used to remove chalk matrix from around a fish skull.
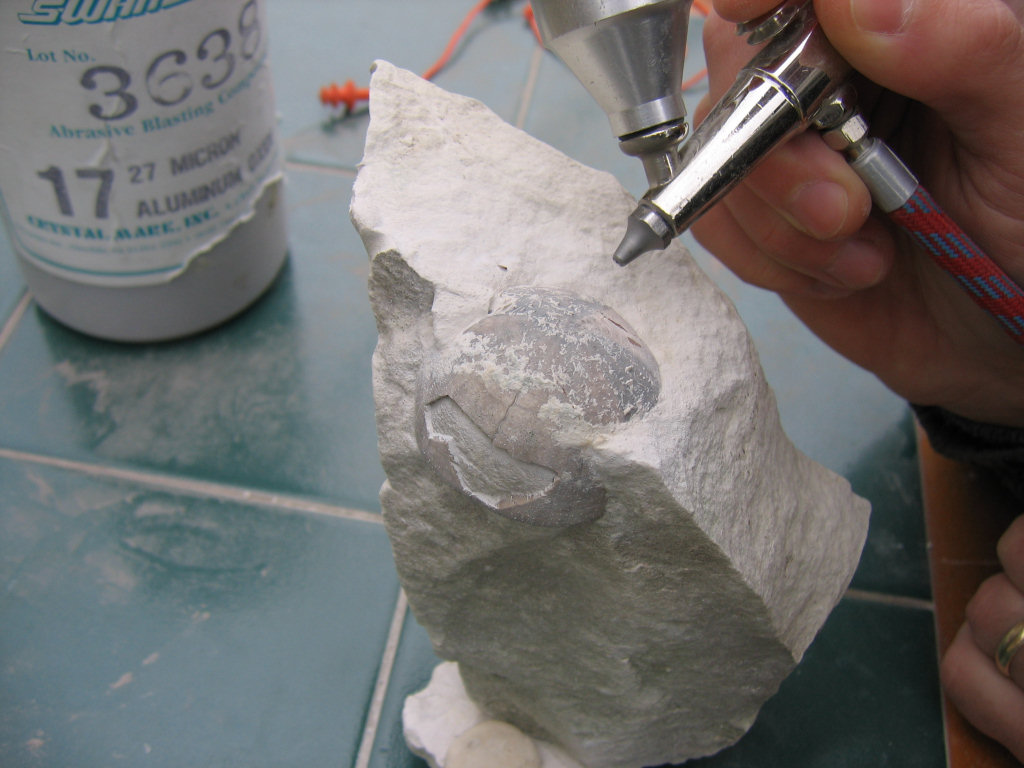
Above: An air-abrasive removes chalk from the surface of an echinoid.
For removing especially hard or large volumes of matrix a mechanical tool such as an air-abrasive (shown above) or an air-pen are effective choices. An air-abrasive dispenses a stream of abrasive particles under pressure which rapidly erode the matrix, albeit in a controlled way. Similarly an air-pen delivers effective results using a vibrating tungsten point to remove the matrix.
For more information please refer to our Conserving Prehistoric Evidence guide.
Reporting an important find
 Above: One of many dinosaur footprints belonging to trackways discovered at Ardley quarry near Oxford in 1997. Reported to various international organisations.
 Above: A well preserved cupedid beetle showing body and both elytra. Reported to Kent RIGS.
Occasionally remarkable fossils are discovered, more often than not by an amateur fossil hunter. It’s important that fossils of scientific value are reported to the relevant organisations in order that they can be considered for study, identification and safe extraction. If you think you’ve found something of scientific value please contact your local museum or a member of the Discovering Fossils team who will put you in contact with the relevant people.
Donating fossils to a museum
Triceratops skull at the Hunterian Museum in GlasgowChalk type fossils at the Booth Museum in Brighton
Left: A triceratops skull at the Hunterian Museum in Glasgow. Right: A drawer of ‘type fossils’ from the Chalk at the Booth Museum in Brighton.
There are instances where an individual fossil or private collection would benefit public understanding of the subject by residing in a publicly accessible location, such as a museum. It’s not uncommon for private collectors to amass hundreds, even thousands of specimens, and while there are arguably benefits to this in the short-term, it’s important that the scientific and long-term future of the specimen(s) are also considered.
For individual fossils that are known or suspected to be scientifically important, such as a new species or one that exhibits a unique or rare characteristic, it’s good practice to allow academics access to study and document it. This may also require that the specimen is made permanently available to other academics, in which case a donation to a relevant museum should be considered. Donations are sometimes provided in return for a plaster/resin replica if requested.
A museum also makes a good permanent home for private collections after the owner has passed away. Although it’s a thought none of us likes to consider, it’s responsible to make plans for the collection’s future. The absence of a future plan could mean the collection falls into the wrong hands and is ultimately split up and sold to commercial dealers. The ideal museum is one that is major enough that the collection will be known to relevant scientists and ideally has a local/regional connection with where the specimens were found. If possible the museum’s curator and close friends and family should be notified of these plans in advance.
For further advice or to discuss the donation of an individual specimen or collection please contact us.
Recommended reading
Below are a selection of recommended books for the study of palaeontology in Britain and internationally as well. Some of the examples listed are no longer in print and will need to be sought from a second-hand supplier – a quick online search usually provides several possible sources.
The Geology of Britain – an introduction, Peter Toghill, ISBN: 1840374047
British Palaeozoic Fossils, The Natural History Museum, ISBN: 1898298718
British Mesozoic Fossils, The Natural History Museum, ISBN: 1898298734
British Caenozoic Fossils, The Natural History Museum, ISBN: 1898298777
British Regional Geology (Series), British Geological Survey, ISBN: 0118844822 (Bristol and Gloucester example)
A Dynamic Stratigraphy of the British Isles, R. Anderton, P. Bridges, M. Leeder and B. Sellwood, ISBN: 0412445107
Vertebrate Palaeontology, M. Benton, ISBN: 9780632056378
Fossil Invertebrates, R. Boardman, A. Cheetham, A. Rowell, ISBN: 0865423024